내가 담당하는 api 서버에서 제공하는 외부/내부 api들을 문서화 하기로 했다.
일반적으로 wiki나 github 등에 문서화를 하면 코드 변경을 계속 반영하기 어려운 문제가 있다. 그걸 해결해주는 대표적인 api 도큐멘트로 swagger 가 있다.
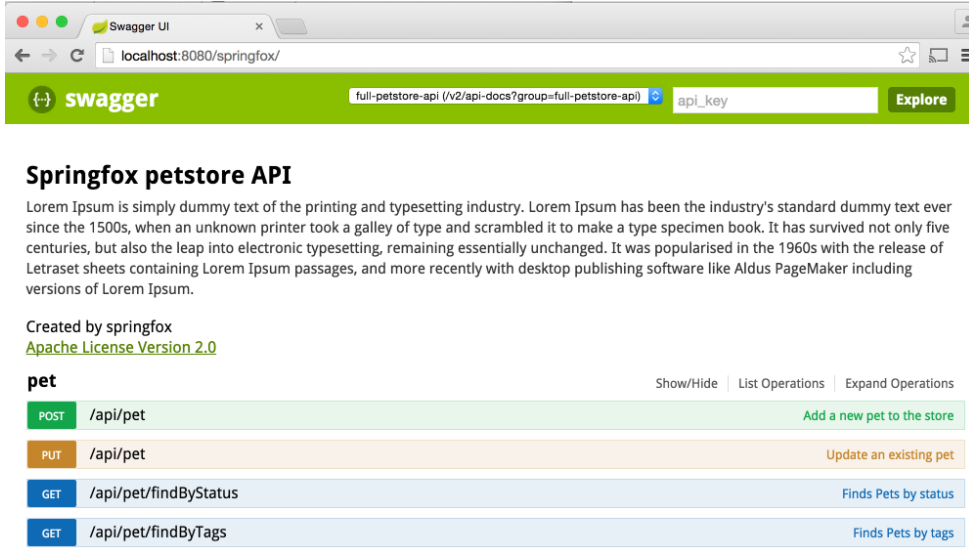
swagger 관련 애노테이션을 추가함으로써 쉽게 도큐멘트 페이지를 제공할 수 있다.
하지만 우리팀은 아래 두가지 이유 때문에 직접 구현하기로 결정했다.
1. api 도큐멘트 다국어 국제화 처리
2. 심플하게 꼭 필요한 정보만 제공 하고 애노테이션 하나만 사용
그리고 직접 구현하기 위해서는 자바 리플렉션 기법이 필요했다.
자바 리플렉션 이란
리플렉션은 자바의 클래스, 메서드, 필드 등의 정보를 확인할 수 있는 API 다.
Class 객체가 주어지면 그 클래스의 생성자, 메서드, 필드에 해당하는 Constructor, Method, Field 인스턴스를 가져 올 수 있고, 이어서 이 인스턴스들로는 그 클래스의 멤버 이름, 필드 타입, 메서드 시그니처 등을 가져 올 수 있다.
예를 들어 아래 String 필드를 하나 갖는 HelloDto 클래스가 있다.
package com.explore.dto;

public class HelloDto {

	private String key;

}
이 클래스에 대한 필드 정보를 리플렉션 기능을 통해 얻을 수 있다.
@Test
void fieldBasicTest() throws Exception {
	Class<?> helloDto = Class.forName("com.explore.dto.HelloDto");
	for (Field eachField : helloDto.getDeclaredFields()) {

		int modifier = eachField.getModifiers();
		String modifierStr = Modifier.toString(modifier);
		System.out.println("field modifier " + modifierStr);

		String name = eachField.getName();
		System.out.println("field name : " + name);

		Type returnType = eachField.getGenericType();
		System.out.println("field return type :" + returnType.getTypeName());
	}
}
결과
field modifier private
field name : key
field return type :java.lang.String
하지만 이펙티브 자바 에서는 리플렉션을 아주 제한된 형태로만 사용해야 한다고 했다(코드 분석 도구나 의존관계 주입 프레임워크).
리플렉션 API를 이용하면 코드가 지저분해지고 장황해진다. 그리고 리플렉션을 통한 메서드 호출은 일반 메서드 호출보다 훨씬 느려 성능 이슈가 있다.
api 도큐멘트 구현 방법
전체적인 flow 는 아래와 같다. 문서화 페이지를 요청할 때마다 api 서버에 있는 모든 Controller 클래스 중에 @Document 애노테이션이 있는것들을 찾아 api 요청, 응답 정보를 얻어 제공한다.
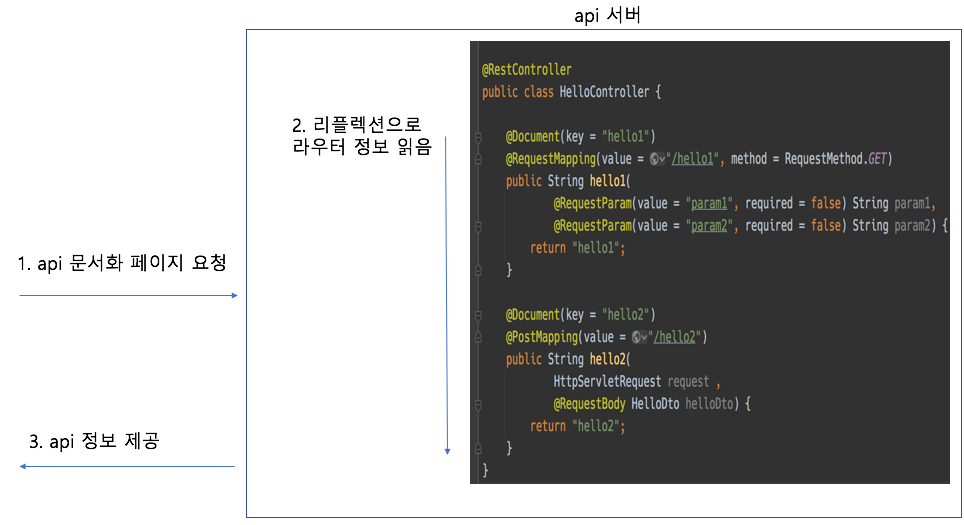
실제로 이 작업을 하기 위해서 reflection 라이브러리를 활용했다.
<dependency>
	<groupId>org.reflections</groupId>
	<artifactId>reflections</artifactId>
	<version>0.9.12</version>
</dependency>
@Service
public class DocumentService {

private Reflections reflections;

@PostConstruct
public void setup() {
	reflections = new Reflections(new ConfigurationBuilder()
			.setUrls(ClasspathHelper.forPackage("com.explore.controller"))
			.setScanners(new SubTypesScanner(),
					new MethodAnnotationsScanner(),
					new MethodParameterNamesScanner(),
					new MethodParameterScanner(),
					new FieldAnnotationsScanner(),
					new TypeAnnotationsScanner()));
}

...
리플렉션할 패키지를 선정하고 scanner 들을 등록한 다음에 아래와 같이 사용하면 된다.
// 2. 리플렉션으로 라우터 정보 가져오기
public void makeDocumentInfo(String locale) {

	Set<Method> targetMethods = reflections.getMethodsAnnotatedWith(Document.class);
	System.out.println(targetMethods);

	for (Method eachMethod : targetMethods) {
		RequestMapping requestMapping = eachMethod.getAnnotation(RequestMapping.class);
		if (requestMapping != null) {
			requestMapping.value();
			requestMapping.method();
			requestMapping.consumes();
		}

		PostMapping postMapping = eachMethod.getAnnotation(PostMapping.class);
		if (postMapping != null) {

       		// 생략 ...
		}
	}
}
복잡한 케이스
컬렉션 객체
요청/응답 정보를 담은 객체가 단순하게 primitive type 만 제공할리 없다. 제네릭 타입이 들어가는건 기본이고 Map 안에 List 가 있는 형태도 흔하다. 이런 경우 리플렉션으로 정보를 읽어와야 하는데 이때 코드가 복잡해 진다.
public class HelloDto {
	private List<String> list;
	private Map<String, Integer> map;
	private Map<String, List<Integer>> map2;

}
위 HelloDto 의 필드 정보들을 가져와보자.
@Test
void reflectionTest2() throws Exception {
  Class<?> helloDto = Class.forName("com.explore.dto.HelloDto");

  for (Field eachField : helloDto.getDeclaredFields()) {
    Type returnType = eachField.getGenericType();

    if (returnType instanceof ParameterizedType) {
      System.out.println("field type :" + returnType.getTypeName());

      String wrappingType = ((ParameterizedType)returnType).getRawType().getTypeName();
      System.out.println("wrappedType : " + wrappingType);

      if (wrappingType.equalsIgnoreCase("java.util.Map")) {
        Type key = (((ParameterizedType)returnType).getActualTypeArguments()[0]);
        Type value = (((ParameterizedType)returnType).getActualTypeArguments()[1]);
        System.out.println("Map InnerType key : " + key);
        System.out.println("Map InnerType value : " + value);
      } else {
        Type unWrappedType = (((ParameterizedType)returnType).getActualTypeArguments()[0]);
        System.out.println("InnerType : " + unWrappedType);
      }
    }

    System.out.println();
  }
}
(결과)
field type :java.util.List<java.lang.String>
wrappedType : java.util.List
InnerType : class java.lang.String

field type :java.util.Map<java.lang.String, java.lang.Integer>
wrappedType : java.util.Map
Map InnerType key : class java.lang.String
Map InnerType value : class java.lang.Integer

field type :java.util.Map<java.lang.String, java.util.List<java.lang.Integer>>
wrappedType : java.util.Map
Map InnerType key : class java.lang.String
Map InnerType value : java.util.List<java.lang.Integer>
메서드 리턴타입
메서드 리턴타입을 구하는데, ResponseEntity<ResultData<List<String>>> 와 같이 제네릭으로 감싸져 있는 경우, 가장 안에 있는 List<String> 을 얻기 위해 재귀를 활용했다. Type 이 ParameterizedType 이면 한꺼풀씩 벗겨내고, 다시 재귀 호출해서 최종적으로 원하는 안쪽 Type 을 얻어낸다.
import java.lang.reflect.Method;
import java.lang.reflect.ParameterizedType;
import java.lang.reflect.Type;
import java.util.List;

import org.springframework.http.ResponseEntity;

public class Main {
  public static void main(String[] args) throws Exception {
    Method method = Main.class.getDeclaredMethod("method1", null);
    ReturnTypeDto returnType = getReturnType(method.getGenericReturnType(), new ReturnTypeDto());
    System.out.println(returnType);
  }

  private ResponseEntity<ResultData<List<String>>> method1() {
    return null;
  }

  // 재귀 호출
  private static ReturnTypeDto getReturnType(Type genericReturnType, ReturnTypeDto returnTypeDto) {
    if (genericReturnType instanceof Class<?>) {
      returnTypeDto.setReturnType((Class<?>)genericReturnType);
      return returnTypeDto;

    } else if (genericReturnType instanceof ParameterizedType) {
      Type unWrappedType = (((ParameterizedType)genericReturnType).getActualTypeArguments()[0]);

      if (unWrappedType instanceof Class<?>) {
        returnTypeDto.setWrappingReturnType(null);
      } else {
        ParameterizedType unWrappedParameterizedType = (ParameterizedType)unWrappedType;
        // List 한정
        if (unWrappedParameterizedType.getRawType().getTypeName().equalsIgnoreCase("java.util.List")) {
          returnTypeDto.setWrappingReturnType(unWrappedParameterizedType);
          return getReturnType(unWrappedParameterizedType.getActualTypeArguments()[0], returnTypeDto);
        }
      }
      return getReturnType(unWrappedType, returnTypeDto);

    } else {
      returnTypeDto.setWrappingReturnType(null);
      returnTypeDto.setReturnType(null);
      return returnTypeDto;
    }
  }

  private static class ResultData<T> {
    private T data;

    public T getData() {
      return data;
    }

    public void setData(T data) {
      this.data = data;
    }
  }

  private static class ReturnTypeDto {
    private ParameterizedType wrappingReturnType;
    private Class<?> returnType;

    public ParameterizedType getWrappingReturnType() {
      return wrappingReturnType;
    }

    public void setWrappingReturnType(ParameterizedType wrappingReturnType) {
      this.wrappingReturnType = wrappingReturnType;
    }

    public Class<?> getReturnType() {
      return returnType;
    }

    public void setReturnType(Class<?> returnType) {
      this.returnType = returnType;
    }

    @Override
    public String toString() {
      return "ReturnTypeDto{" +
              "wrappingReturnType=" + wrappingReturnType +
              ", returnType=" + returnType +
              '}';
    }
  }
}
cf) 재귀를 좀 더 나이스한 방식으로 해결한게 있는데 yangbongsoo.tistory.com/26 에 정리했다.
종합적인 클래스
마지막으로 아래 ComplicatedDto 클래스 정보를 가져온다고 해보자.
public class ComplicatedDto {
  private int complicatedDtoInt;
  private boolean complicatedDtoBoolean;
  private float complicatedDtoFloat;
  private Map<String, String> complicatedDtoMap;
  private Test4Dto test4Dto;
  private List<Test5Dto> test5DtoList;

  public static class Test4Dto {
    private List<String> test4DtoList;
    private Set<String> test4DtoSet;
    private Map<String, String> test4DtoMap;
  }

  public static class Test5Dto {
    private String test5DtoString1;
    private String test5DtoString2;
    private String test5DtoString3;
    private String test5DtoString4;
  }
}
Test4Dto, Test5Dto 같이 내가 만든 객체는 재귀를 통해 객체 안에 객체 정보를 가져와야 하지만 int, boolean, float 그리고 컬렉션 객체들은 그럴 필요가 없다. 따라서 이를 구분해주는 조건이 필요한데 Package 객체의 getSpecificationVendor() 메서드를 이용했다.
Class<?> 객체의 getPackage() 메서드를 통해서 Package 객체를 얻고, Package 의 getSpecificationVendor() 메서드 리턴 값이
'Oracle Corporation' 인지 'null' 인지에 따라 재귀를 호출할건지 결정했다(내가 만든 크래스는 null).
cf) 자바 11 OpenJDK 를 이용한 경우는 위의 구분이 올바르지 않다.
다국어 국제화 처리
도큐멘트 다국어 국제화 처리는 아래와 같이 @Document 애노테이션 key 값으로 미리 정의된 메세지 파일을 통해 처리한다.
@Service
public class DocumentService {

  private Reflections reflections;

  @Autowired
  private MessageSource messageSource;


  // 2. 리플렉션으로 라우터 정보 가져오기
  public void makeDocumentInfo(String locale) {

    Set<Method> targetMethods = reflections.getMethodsAnnotatedWith(Document.class);
    System.out.println(targetMethods);

    for (Method eachMethod : targetMethods) {

      Document documentAnnotation = eachMethod.getAnnotation(Document.class);
      String key = documentAnnotation.key();
      String description = messageSource.getMessage(key + ".description", null, LocaleUtils.toLocale(locale));
    }
  }

...
참고로 서비스 레이어(@Service) 에서 messageSource DI 받는것에 대해서 한번 짚고 넘어가야할 부분이 있다.
스프링 부트를 사용할 땐 큰 고민없이 messageSource 빈 등록을 하면 된다.
@Bean
public MessageSource messageSource() {
	ReloadableResourceBundleMessageSource messageSource = new ReloadableResourceBundleMessageSource();
	messageSource.setBasename("classpath:messages/message");
	messageSource.setDefaultEncoding("UTF-8");
	messageSource.setFallbackToSystemLocale(false);
	return messageSource;
}
하지만 스프링 부트가 아니고 xml 방식으로 빈 등록하는 옛 프로젝트들을 보면 applicationContext.xml 과 servlet-context.xml 로 나눠서 빈을 등록한것을 볼 수 있다. 일반적으로 servlet-context.xml 에는 웹과 관련된 설정들, 예를 들어 controller 빈등록이나 viewResolver 설정, 그리고 messageSource 설정이 있다. 국제화 처리 작업은 사용자 로케일에 따라 보여지는 화면이 달라지니 이곳에 등록한다. applicationContext.xml 에는 service, repository, component 빈 등록이나 dataSource, aop 등의 설정을 한다.
그런데 위의 상황과 같이 서비스 레이어에서 messageSource 를 쓰기 위해선 빈 등록을 applicationContext.xml 에 등록해야 한다.
applicationContext.xml 에 등록된 빈들은 servlet-context.xml 에 등록된 빈들에서 사용할 수 있지만,
servlet-context.xml 에 등록된 빈들은 applicationContext.xml 에 등록된 빈들에서 사용할 수 없기 때문이다.
마지막으로 스프링 부트에서 messageSource 가 기본적으로 빈 등록 되어있는지 확인 하기 위해서 등록된 빈 정보들을 출력해서 확인해보는 것도 좋다.
@SpringBootApplication
public class ExploreApplication {

	private static ApplicationContext applicationContext;

	public static void main(String[] args) {
		applicationContext = SpringApplication.run(ExploreApplication.class, args);
		displayAllBeans();
	}

	public static void displayAllBeans() {
		String[] allBeanNames = applicationContext.getBeanDefinitionNames();
		for(String beanName : allBeanNames) {
			System.out.println(beanName);
		}
	}
}
참고 : 토비 스프링
참고 : 자바 성능 튜닝 이야기
참고 : 이펙티브 자바 item 65
'Java' 카테고리의 다른 글
| Singleton(면접단골질문) (0) | 2021.05.09 |
|---|---|
| Optional 형태가 가지는 의미(Monad) (0) | 2021.05.06 |
| method return에 대한 고민 (2) | 2021.02.07 |
| 오버로딩vs오버라이딩(면접단골질문) (2) | 2021.01.22 |
| Finalizer attack (3) | 2021.01.17 |